OAK PoE设备独立模式详细介绍及使用

POE 设备独立模式
独立运行模式意味着 OAK 相机可以脱离其他计算机自己独立工作,并且可以通过相机端编程来实现和其他设备的自定义数据交互。该模式下工作,需要把 OAK 相机端运行的程序和 NN 模型全部加载到 OAK 相机内置的 Flash 中保存。设备启动后,OAK 相机的主控可以将 Flash 中的程序和 NN 模型加载到 OAK 的闪存中运行。
由于主机和设备之间不会有任何通信,因此首先需要删除所有 XLinkOut 和 XLinkIn 节点。这意味着设备只能通过 Script 节点(网络协议:HTTP/TCP/UDP)与 “外部世界” 通信。
Flash 引导加载程序
Bootloader 与 depthai 打包在一起,因此如果您有最新的 depthai 版本,您可以闪存最新的 Bootloader 版本。要 Flash 引导加载程序,使用 python poe_standalone/standalone.py flash_bootloader 或 poe_standalone flash_bootloader 。
要查看其背后的 API 代码,请参见FlashBootloader示例代码。
Flash 管道
已经在设备上Flash 引导加载程序之后,可以将管道连同它的资产 (NN 模型) 一起 Flash 到 OAK 的闪存:python poe_standalone/standalone.py -P <pipeline> flash_pipeline 或 poe_standalone -P <pipeline>flash_pipeline
代码参考
import depthai as dai

pipeline = dai.Pipeline()

# Define standalone pipeline; add nodes and link them
# cam = pipeline.create(dai.node.ColorCamera)
# script = pipeline.create(dai.node.Script)
# ...

# Flash the pipeline
(f, bl) = dai.DeviceBootloader.getFirstAvailableDevice()
bootloader = dai.DeviceBootloader(bl)
progress = lambda p: print(f'\rFlashing progress: {p:.2%}')
bootloader.flash(progress, pipeline)
成功 Flash 管道后,当您启动设备时,它将自动启动。如果要更改管道,只需再次重新 Flash。
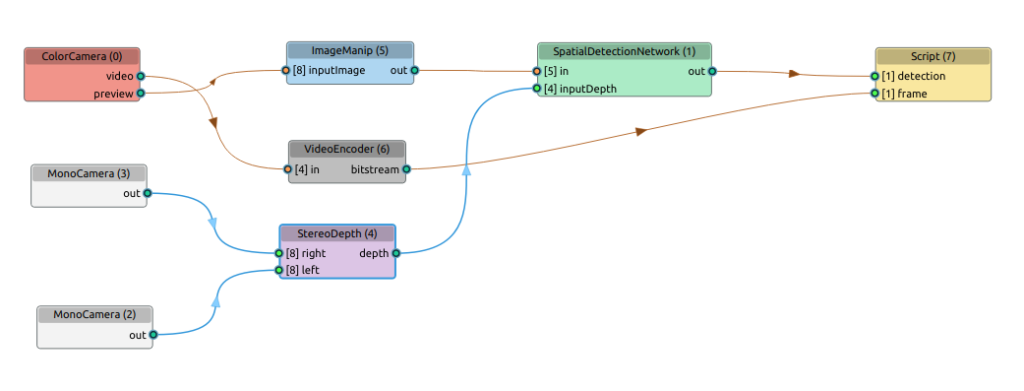
管道可视化
- simple_pipeline

- yolo_stereo_decoding

代码示例
github 仓库:OAK-POE Standalone
安装(可选)
pip install -e .或者
pip install .使用帮助
python poe_standalone/standalone.py -h 或 poe_standalone -h
 Usage: standalone.py [OPTIONS] COMMAND [ARGS]...

 OAK POE STANDALONE SCRIPTS

╭─ Options ────────────────────────────────────────────────────────────────────╮
│ --device_ip        -device_ip  IP ADDRESS             The IP of the OAK      │
│                                                       device you want to     │
│                                                       connect to. The        │
│                                                       default is to list all │
│                                                       for you to choose      │
│                                                       from.                  │
│ --host_ip          -host_ip    IP ADDRESS             The IP of the Host pc  │
│                                                       you want to connect    │
│                                                       to.                    │
│                                                       [default: 192.168.0.1] │
│ --pipeline         -P          [script_http_server|s  Pipeline you want to   │
│                                cript_mjpeg_server|tc  start.                 │
│                                p_streaming_server|tc  [default:              │
│                                p_streaming_server_co  script_http_server]    │
│                                nfig_focus|tcp_stream                         │
│                                ing_client|yolo_decod                         │
│                                ing|yolo_stereo_decod                         │
│                                ing|custom_pipeline]                          │
│ --custom_pipeline  -cp         FILE PATH              The custom pipeline    │
│                                                       you want to start.     │
│ --port             -p          INTEGER                NETWORK PORT           │
│                                                       [default: 5000]        │
│ --blob_path        -b          FILE PATH              YOLO Blob path to use  │
│ --config_path      -c          FILE PATH              YOLO Config path to    │
│                                                       use                    │
│ --help             -h                                 Show this message and  │
│                                                       exit.                  │
╰──────────────────────────────────────────────────────────────────────────────╯
╭─ Commands ───────────────────────────────────────────────────────────────────╮
│ clear_pipeline    Clear the flashed app on the device                        │
│ flash_bootloader  Flash the bootloader to the device                         │
│ flash_pipeline    Flash the pipeline to the device                           │
│ run               Run the program in host mode                               │
│ save_pipeline     Saves application package to a file which can be flashed   │
│                   to depthai device.                                         │
│ set_ip            Sets IP of the POE device                                  │
╰──────────────────────────────────────────────────────────────────────────────╯
示例管道
管道启动:
python poe_standalone/standalone.py -P script_mjpeg_server [flash_pipeline]
或
poe_standalone -P script_mjpeg_server [flash_pipeline]
- script_http_server – 通过 HTTP 响应提供静止图像 参考
- script_mjpeg_server – 通过 HTTP 响应提供 MJPEG 视频流 参考
- tcp_streaming_server – 通过 TCP 协议使用 OAK PoE 流式传输帧(和其他数据)(作为服务器)参考
- tcp_streaming_server_config_focus – 与 tcp_streaming_server 类似,仅添加了从主机通过
.和,键配置 OAK PoE 焦点的选项。参考 - tcp_streaming_client – 通过 TCP 协议使用 OAK PoE 流式传输帧(和其他数据)(作为客户端)参考
- yolo_decoding – 通过 TCP 协议使用 OAK PoE 流式传输 yolo 检测结果,
其中包含标签、置信度和边界框信息 (xmin、 ymin、 xmax、ymax) - yolo_stereo_decoding – 与 yolo_decoding 类似,还包括检测到的对象的 XYZ 坐标。
- custom_pipeline – 自定义管道参考代码
主机端测试程序
启动:
python poe_host/tcp_streaming_server_host.py
或
tcp_streaming_server_host
自定义管道参考代码
#!/usr/bin/env python3
# coding=utf-8
import time

import depthai as dai
from loguru import logger
from string import Template

try:
    from poe_standalone.utils import getDeviceInfo
except ImportError:
    from utils import getDeviceInfo


def create_pipeline(port=5000, blob_path=None, config_path=None, host_ip=None):
    # 开始定义管道
    pipeline = dai.Pipeline()

    # 定义源 - 彩色相机
    cam = pipeline.create(dai.node.ColorCamera)
    # 视频编码器
    jpeg = pipeline.create(dai.node.VideoEncoder)
    jpeg.setDefaultProfilePreset(cam.getFps(), dai.VideoEncoderProperties.Profile.MJPEG)

    # 脚本节点
    script = pipeline.create(dai.node.Script)
    script.setProcessor(dai.ProcessorType.LEON_CSS)
    scrpt_str = Template("""
        from http.server import BaseHTTPRequestHandler
        import socketserver
        import socket
        import fcntl
        import struct

        PORT = ${_PORT}
        ctrl = CameraControl()
        ctrl.setCaptureStill(True)

        def get_ip_address(ifname):
            s = socket.socket(socket.AF_INET, socket.SOCK_DGRAM)
            return socket.inet_ntoa(fcntl.ioctl(
                s.fileno(),
                -1071617759,  # SIOCGIFADDR
                struct.pack('256s', ifname[:15].encode())
            )[20:24])

        class HTTPHandler(BaseHTTPRequestHandler):
            def do_GET(self):
                if self.path == '/':
                    self.send_response(200)
                    self.end_headers()
                    self.wfile.write(b'<h1>[DepthAI] Hello, world!</h1><p>Click <a href="img">here</a> for an image</p>')
                elif self.path == '/img':
                    node.io['out'].send(ctrl)
                    jpegImage = node.io['jpeg'].get()
                    self.send_response(200)
                    self.send_header('Content-Type', 'image/jpeg')
                    self.send_header('Content-Length', str(len(jpegImage.getData())))
                    self.end_headers()
                    self.wfile.write(jpegImage.getData())
                else:
                    self.send_response(404)
                    self.end_headers()
                    self.wfile.write(b'Url not found...')

        with socketserver.TCPServer(("", PORT), HTTPHandler) as httpd:
            node.warn(f"Serving at {get_ip_address('re0')}:{PORT}")
            httpd.serve_forever()
    """)
    script.setScript(
        scrpt_str.safe_substitute(_PORT=port)
    )

    # 连接
    cam.still.link(jpeg.input)
    script.outputs["out"].link(cam.inputControl)
    jpeg.bitstream.link(script.inputs["jpeg"])

    return pipeline


if __name__ == "__main__":
    with logger.catch():
        # Connect to device with pipeline
        device_info = getDeviceInfo()
        with dai.Device(create_pipeline(port=5000, blob_path=None, config_path=None, host_ip=None),
                        device_info) as device:
            print(f"\t>>> Name: {device_info.name}")
            print(f"\t>>> MXID: {device.getMxId()}")
            print(f"\t>>> Cameras: {[c.name for c in device.getConnectedCameras()]}")
            print(f"\t>>> USB speed: {device.getUsbSpeed().name}")
            while not device.isClosed():
                time.sleep(1)
