OAK相机如何将YOLOX模型转换成blob格式?(0.1.1pre 及之后版本)
▌pth 转换为 .onnx
可以使用预训练模型(onnx) releases
或者使用 YOLOX 自带的 export_onnx 将 pytorch 模型转换为 onnx 模型
可参考 Convert Your Model to ONNX
简单示例
python3 tools/export_onnx.py --output-name yolox_nano.onnx -n yolox_nano-s -c yolox_nano.pth▌编辑 ONNX 模型
可以使用 Netron 查看模型结构
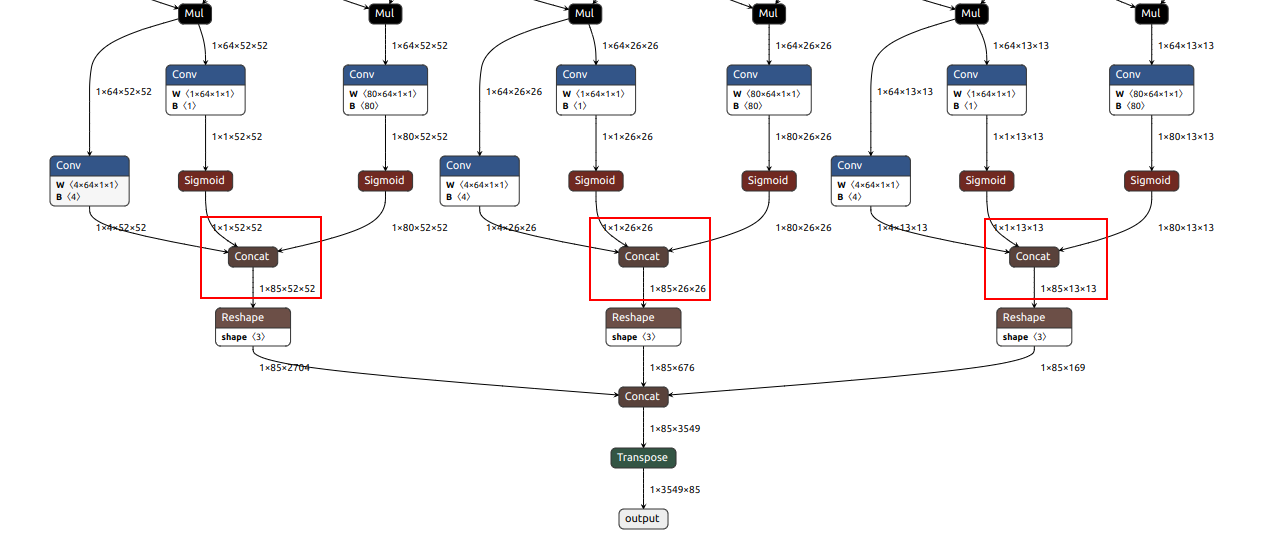
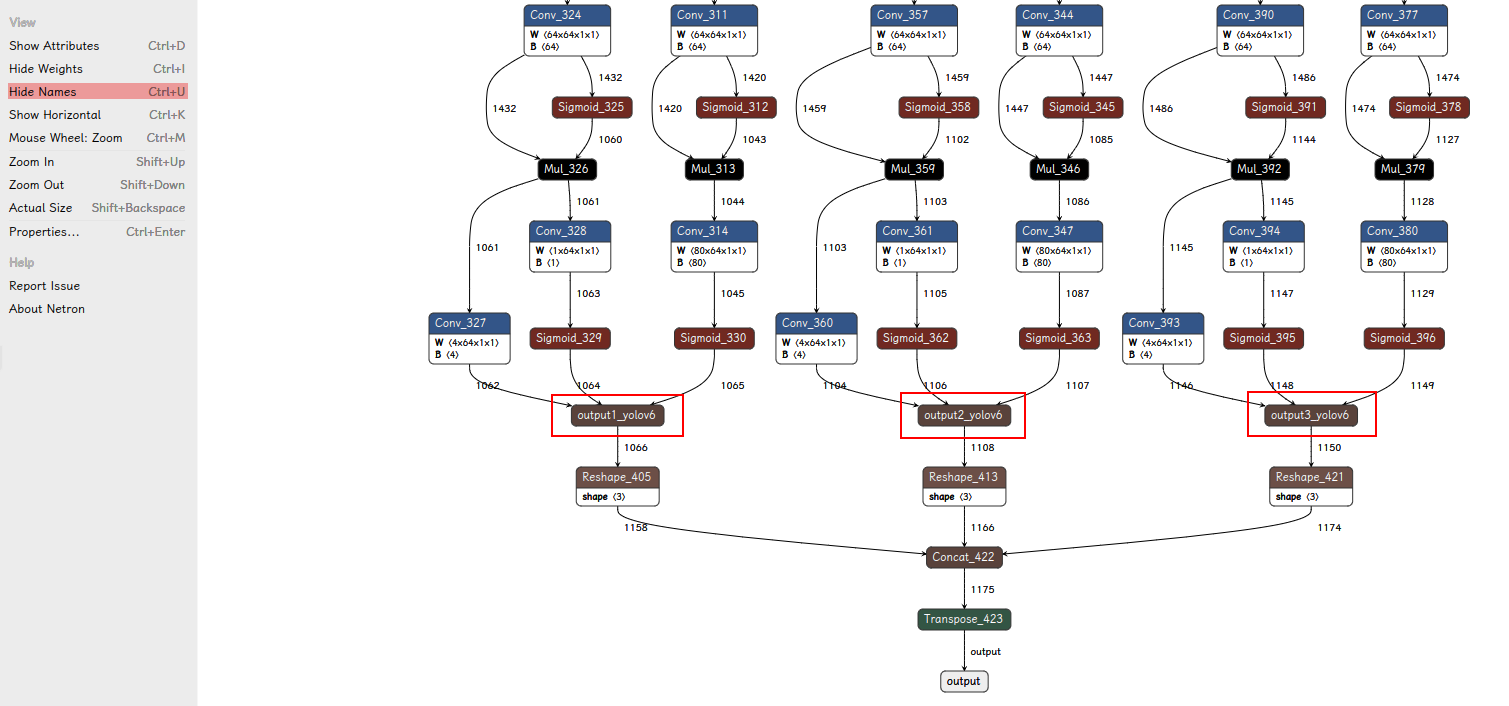
我们需要的是上图红框标出的 3 个 Concat 层,并将其命名为 output1_yolov6,output2_yolov6,output3_yolov6。(我们使用 oak 中解析 anchor free 的预制方法(yolov6))
# coding=utf-8
import onnx

onnx_model = onnx.load("yolox_nano.onnx")

concat_indices = []
for i, n inenumerate(onnx_model.graph.node):
    if"Concat"in n.name:
        concat_indices.append(i)
input1, input2, input3 = concat_indices[-4:-1]

onnx_model.graph.node[input1].name = 'output1_yolov6'
onnx_model.graph.node[input2].name = 'output2_yolov6'
onnx_model.graph.node[input3].name = 'output3_yolov6'


onnx.save(onnx_model, "yolox_nano.onnx")
▌转换
openvino 本地转换
onnx -> openvino
mo 是 openvino_dev 2022.1 中脚本,
安装命令为
pip install openvino-dev
mo --input_model yolox_nano.onnx --reverse_input_channel --output "output1_yolov6,output2_yolov6,output3_yolov6"openvino -> blob
compile_tool 是 OpenVINO Runtime 中脚本,
<path>/compile_tool -m yolox_nano.xml \
-ip U8 -d MYRIAD \
-VPU_NUMBER_OF_SHAVES 6 \
-VPU_NUMBER_OF_CMX_SLICES 6
在线转换
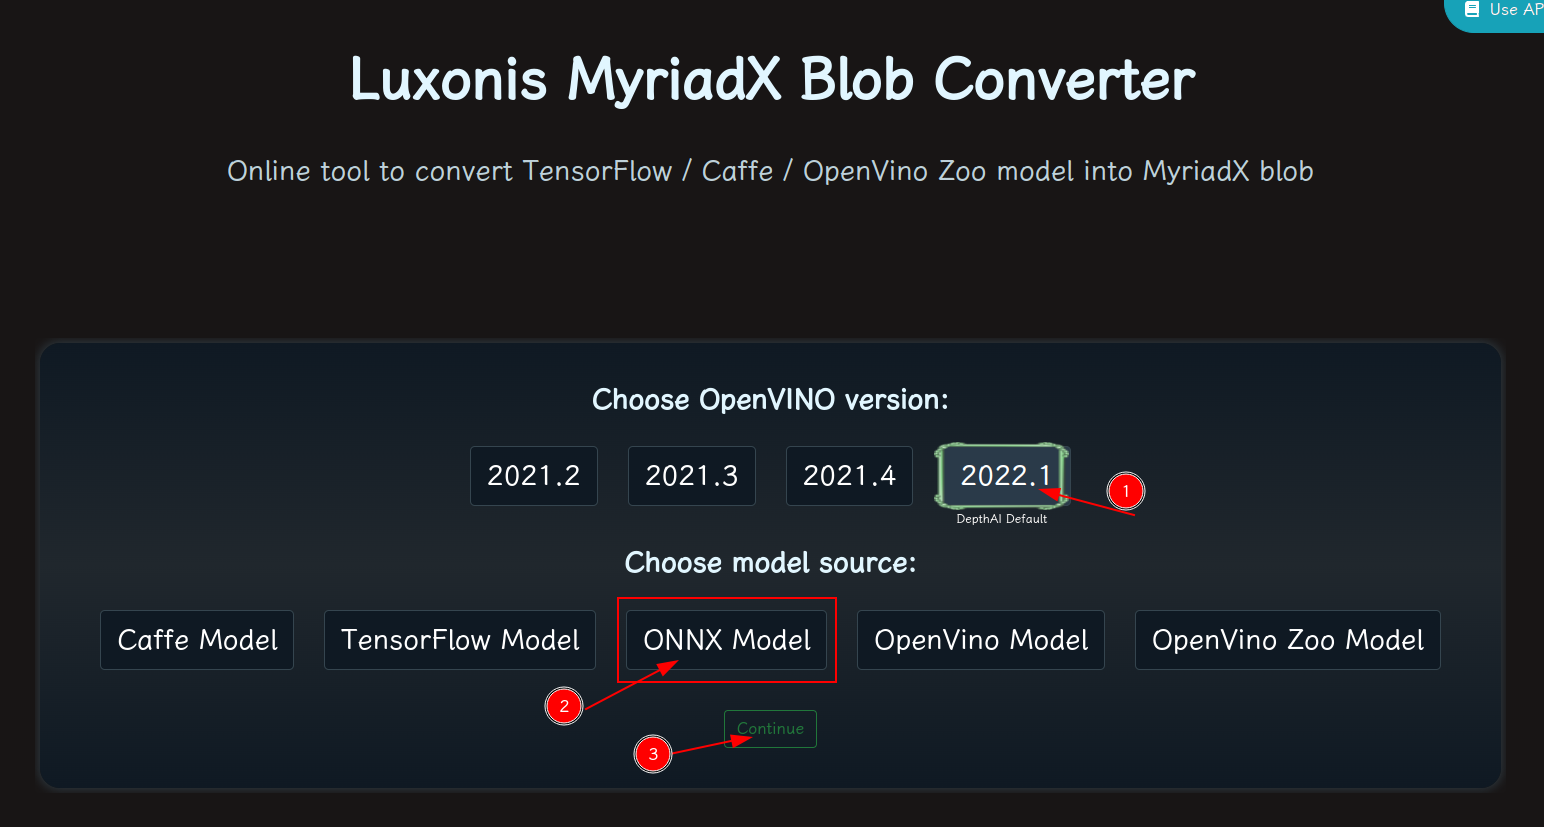
blobconvert 网页 http://blobconverter.luxonis.com/
- 进入网页,按下图指示操作:
- 修改参数,转换模型:
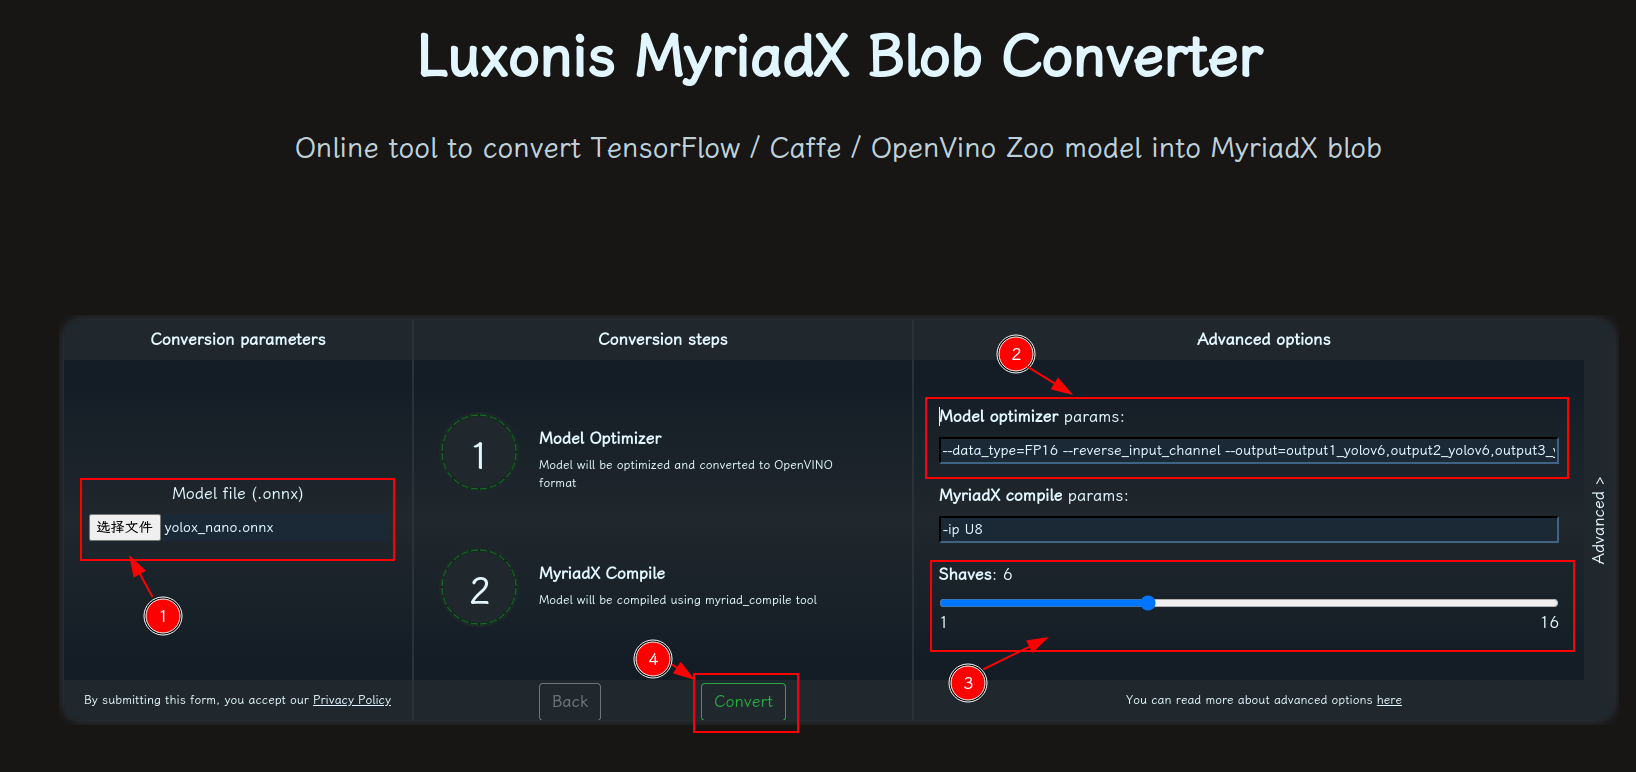
- 选择 onnx 模型
- 修改
optimizer_params为--data_type=FP16 --reverse_input_channel --output=output1_yolov6,output2_yolov6,output3_yolov6 - 修改
shaves为6 - 转换
blobconverter python 代码
blobconverter.from_onnx(
            "yolox_nano.onnx",
            optimizer_params=[
                "--reverse_input_channel",
                "--output=output1_yolov6,output2_yolov6,output3_yolov6",
            ],
            shaves=6,
        )
blobconvert cli
blobconverter --onnx yolox_nano.onnx -sh 6 -o . --optimizer-params "reverse_input_channel --output=output1_yolov6,output2_yolov6,output3_yolov6"▌DepthAI 示例
正确解码需要可配置的网络相关参数:
- setNumClasses – YOLO 检测类别的数量
- setIouThreshold – iou 阈值
- setConfidenceThreshold – 置信度阈值,低于该阈值的对象将被过滤掉
# coding=utf-8
import cv2
import depthai as dai
import numpy as np

numClasses = 80
model = dai.OpenVINO.Blob("yolox_nano.blob")
dim = next(iter(model.networkInputs.values())).dims
W, H = dim[:2]

output_name, output_tenser = next(iter(model.networkOutputs.items()))
if "yolov6" in output_name:
    numClasses = output_tenser.dims[2] - 5
else:
    numClasses = output_tenser.dims[2] // 3 - 5

labelMap = [
    # "class_1","class_2","..."
    "class_%s" % i
    for i in range(numClasses)
]

# Create pipeline
pipeline = dai.Pipeline()

# Define sources and outputs
camRgb = pipeline.create(dai.node.ColorCamera)
detectionNetwork = pipeline.create(dai.node.YoloDetectionNetwork)
xoutRgb = pipeline.create(dai.node.XLinkOut)
xoutNN = pipeline.create(dai.node.XLinkOut)

xoutRgb.setStreamName("image")
xoutNN.setStreamName("nn")

# Properties
camRgb.setPreviewSize(W, H)
camRgb.setResolution(dai.ColorCameraProperties.SensorResolution.THE_1080_P)
camRgb.setInterleaved(False)
camRgb.setColorOrder(dai.ColorCameraProperties.ColorOrder.BGR)

# Network specific settings
detectionNetwork.setBlob(model)
detectionNetwork.setConfidenceThreshold(0.5)

# Yolo specific parameters
detectionNetwork.setNumClasses(numClasses)
detectionNetwork.setCoordinateSize(4)
detectionNetwork.setAnchors([])
detectionNetwork.setAnchorMasks({})
detectionNetwork.setIouThreshold(0.5)

# Linking
camRgb.preview.link(detectionNetwork.input)
camRgb.preview.link(xoutRgb.input)
detectionNetwork.out.link(xoutNN.input)

# Connect to device and start pipeline
with dai.Device(pipeline) as device:
    # Output queues will be used to get the rgb frames and nn data from the outputs defined above
    imageQueue = device.getOutputQueue(name="image", maxSize=4, blocking=False)
    detectQueue = device.getOutputQueue(name="nn", maxSize=4, blocking=False)

    frame = None
    detections = []

    # nn data, being the bounding box locations, are in <0..1> range - they need to be normalized with frame width/height
    def frameNorm(frame, bbox):
        normVals = np.full(len(bbox), frame.shape[0])
        normVals[::2] = frame.shape[1]
        return (np.clip(np.array(bbox), 0, 1) * normVals).astype(int)

    def drawText(frame, text, org, color=(255, 255, 255), thickness=1):
        cv2.putText(
            frame, text, org, cv2.FONT_HERSHEY_SIMPLEX, 0.5, (0, 0, 0), thickness + 3, cv2.LINE_AA
        )
        cv2.putText(
            frame, text, org, cv2.FONT_HERSHEY_SIMPLEX, 0.5, color, thickness, cv2.LINE_AA
        )

    def drawRect(frame, topLeft, bottomRight, color=(255, 255, 255), thickness=1):
        cv2.rectangle(frame, topLeft, bottomRight, (0, 0, 0), thickness + 3)
        cv2.rectangle(frame, topLeft, bottomRight, color, thickness)

    def displayFrame(name, frame):
        color = (128, 128, 128)
        for detection in detections:
            bbox = frameNorm(
                frame, (detection.xmin, detection.ymin, detection.xmax, detection.ymax)
            )
            drawText(
                frame=frame,
                text=labelMap[detection.label],
                org=(bbox[0] + 10, bbox[1] + 20),
            )
            drawText(
                frame=frame,
                text=f"{detection.confidence:.2%}",
                org=(bbox[0] + 10, bbox[1] + 35),
            )
            drawRect(
                frame=frame,
                topLeft=(bbox[0], bbox[1]),
                bottomRight=(bbox[2], bbox[3]),
                color=color,
            )
        # Show the frame
        cv2.imshow(name, frame)

    while True:
        imageQueueData = imageQueue.tryGet()
        detectQueueData = detectQueue.tryGet()

        if imageQueueData is not None:
            frame = imageQueueData.getCvFrame()

        if detectQueueData is not None:
            detections = detectQueueData.detections

        if frame is not None:
            displayFrame("rgb", frame)

        if cv2.waitKey(1) == ord("q"):
            break
